Showing posts with label Techniques. Show all posts

Thursday, 18 November 2010

More dyeing adventures- oven dyeing

I have been doing lots of dyeing lately, because of this I decided to try out a new technique- oven dyeing. The presoaked yarn is put in a baking tray (a deep one) with enough water and vinegar to just cover it, then dyes are poured on and smooshed about. The tray is covered with foil and put in the oven for about 40 minutes. It is left to cool then washed and dried as usual.
s
s
There were a couple of reasons for trying this-
  • It is less messy than wrapping in cling film and steaming, I always get leaks!
  • The pans and foil are reusable, whereas the cling film gets binned
  • I can get two pans in the oven at a time, dyeing 200g but only 100g in the steamer pot.

There were a few problems with the method. The superwash yarn and fibres I used slurp up the dye pretty quickly, leaving you with white bits, especially on the bottom. And no one wants a white bottom!

I found that plenty of smooshing with a spoon helped, also turning the fibre/yarn over and adding half the dye to the bottom was effective if a little messy (plenty of old newspaper all round to catch the drips). If all else fails call it intentional!

The other problem I had was with the pans I bought. I initially got some solid metal trays in preference to foil ones as I was worried about the foil bending when it was full (which it does). This was ok, but I don't think they appreciated sitting overnight full of vinegery water as the fibre cooled. Rust patches started to develop, and I have been told rust can affect how the colours come out.

As a solution I am currently using foil trays sat in the now slightly rusty pans. This works quite well as there is less water to heat as the foil pans are smaller (saves energy) and the solid metal pans stop the foil bending and dye going all over the carpet. Also if the dye tray does bubble over a little it goes into the second pan rather than all over the oven.

This picture shows close up of the yarn in the dye, it looks so pretty, I think it is even better when it is wet than when it is dry, all shiny. Maybe I need to experiment with different base yarns! The grabbiness of the superwash can be seen here in the fact the blue and purple are sat next to each other with almost no bleeding.
s


Thursday, 21 October 2010

Techniques- Fleece washing round up

As I tried a lot of fleece washing methods I thought a round up post would be a good idea so next year I can see what to do and what to avoid.
s
Starting with this, a Suffolk fleece, so fairly robust and felting resistant.
s
s
Lingerie bags and buckets
Sort the fleece into chunks and place them into lingerie washing/laundry bags. Not too much in each bag.
Put the bags into a bucket(s) of cold water and leave to soak for a few hours. Change the water and give them a second cold soaking for a while, even overnight. Do not pack too much into each bucket.
Do a very hot wash cycle- once with dish washing soap, once with clear water and once with vinegar and a little hair conditioner, soaking for about twenty minutes each time. Do not run hot water directly onto the fleece or go from hot to cold water. Avoid moving the fleece too much.
Drain and squeeze/spin as much of the water out as possible.
Hang the bags to dry or lay them flat over a mesh drier.
s
This gives a fairly clean fleece, there were still some dirty patches and the tips were stuck together. It also uses a lot of hot water.
s
Lock by lock
Prepare three tubs/buckets as for the hot wash cycle above.
Pull a lock from the fleecey mass and swish it in each of the buckets in turn until it is clean. Put into lingerie bags to dry.
s
This gets the fibre nice and clean and the locks are sorted ready for combing or carding. It takes ages though and losing the bit of dirtiness at the tip of the lock means it does not stay together particularly well during the drying.
s
Bags of locks
Take a chunk of fleece and gently but firmly pull out all of the locks. Lay them flat and thinly spread into lingerie type washing bags.
Do a cold water soak for several hours/overnight.
Do a three cycle hot wash (soap, nothing, vinegar and hair conditioner) trying to keep the bag fairly flat to avoid the locks clumping together. Lay flat to dry.
s
This gave fairly clean locks which dried very quickly. There is also less to store as the junk has been removed and time is saved when carding/combing as the locks are already sorted for you. It does take ages to get them sorted and into bags though.
s
Washing machine on cold
Sort the fleece into chunks and place into lingerie bags. Put through the washing machine on a cold wash with normal machine washing liquid.
Do a three cycle hot wash (soap, nothing, vinegar and hair conditioner) and spin/squeeze out as much water as possible. Dry.
s
A little felting occurred, as the machine wash did not remove the lanolin at all it was not really worth doing.
s
Washing machine on warm
Sort the fleece into chunks and place into lingerie bags.
Put through washing machine at 40 degrees centigrade using normal machine washing liquid.
Dry
s
This method resulted in quite a bit of felting, it was possible to pull locks out though. There was no greasiness left in the fibre. Also not really worth doing.
s
Shower hosing
Divide fleece in manageable chunks. Put in bath tub and spray with shower set to cold until the water is running clear from all parts of the fleece.
Do a three cycle hot wash (soap, nothing, vinegar and hair conditioner) then squeeze/spin water out and put into laundry bags to dry.
s
This worked well and gave the cleanest of the washes. It does still smell a bit sheepy, I think more water during the hot wash stage might have helped. This could be a downside of washing in fairly large chunks.
I am most likely to use this method to wash the fleece I have left.
s
The end result (this was a bags of locks wash):
s


Thursday, 9 September 2010

Techniques- Beading

The something new for this week is knitting with beads. I bought some a while back to give it a go and finally managed to pick a yarn and project that called for them.
s
Like everything in knitting I'm sure there are a lot of ways to use beads when you knit, this is just one method, it is given in the pattern for Bead the cable by Lykkefanten (which is what I am making) and positions a single bead between two vertical rows of knit stitches. Details are given for working in the round, the beading pattern is worked over four rounds.
s
First up pick your yarn and beads. The hole in the bead needs to be big enough to allow the yarn to be threaded through, but not hugely big.
Thread enough beads onto the yarn for the project before you start knitting, maybe add a couple of extras in case of counting errors or broken beads, its easier to add a few at the start than when you are knitting.
s
s
The set up for this project gives the beading area a P1, K2, P1, but as long as there are two knit stitches to work between that will be fine. The following will assume you are working with a K2, but it could easily be K4 or more.
s
Round one:
Work until the K2 is reached, knit the first stitch then make a stitch: lift the yarn between the needles onto the left needle by poking front to back...
s
s
Then knit the back leg of this loop to make a stitch.
s
Knit the third stitch (previously the second stitch). Repeat this around the round in each location you want a bead.
s
Round two:
Work until you reach the K3 where the bead is to be placed. Knit the first stitch.
Bring the yarn to the front of the work (as if you are going to purl) then slide a bead along the yarn.
s
s
Slide the bead all the way along until it is sat snugly against the right needle.
s
s
Slip the next stitch- poke your needle in as if you are going to knit it and slide it off the left needle onto the right.
s
s
Take the yarn to the back of the work (as if you are going to knit). Keep the bead at the front of the and make sure it sits snugly on the work.
You have wrapped the slipped stitch with the bead sat on the wrap.
s
s
Knit the third stitch of the K3. Work around the round repeating this process at each bead location
s
s
Round three:
Work to the K3.
Knit the first stitch then knit the next two stitches together, decreasing them back to one.
Repeat around the round at each bead location.
s
s
Round four:
Work to the bead location and K2.
Repeat around round at each bead location.
s
The process can be repeated to add more beads as required. In the "Bead the Cable" pattern vertical rows of beads sit between cables, the beads in alternating rows are offset.
s
s
I apologise for the picture quality, I need to organise some better lighting. This yarn is also my photographic nemesis- in real life is is a very dark purple with bits of plum, blue and black but I can't seem to get a decent picture!


Thursday, 2 September 2010

Techniques- Fleece washing take 2

With the first fleece washed I decided to experiment a bit more with washing the second one. I tried out three different methods this time.
s
Since carding means pulling out the locks to load onto the carder I figured doing this before washing means less fibre to wash and store as the rubbishy bits are removed.
s
s
Locks pulled out from the fleece:
s
s
Put into a washing bag flat in thin layers
s
s
The bags of locks were washed in the same way as the bags of fleece- a cold soak followed by a hot soapy wash, a hot rinse and a final hot rinse with vinegar and hair conditioner. Excess water was squeezed out and the bags laid out to dry.
s
s
The fibre was cleaner than that washed without sorting, and also dried faster. It takes much longer though as the locks have to be sorted before washing. This means keeping stinky fleece around the place longer which is a bit of a drawback.
s
s
In the search for speed I risked a few bags of fleece in the washing machine. The first was on a cold wash with regular clothes washing liquid. Some felting occured, not too badly and locks could still be pulled out. The cold wash had not cleaned out the lanolin so the fibre was still greasy and smelled sheepy. These bags went through the hot handwash process to finish them so not much time saved.
s
s
The second machine wash was a 40 degree one. A lot of feltiness in places with this one but still possible to pull locks out and they should be fine for carding or combing. The lanolin seems to have been mostly washed out of this one so no handwashing required.
s
s
Next week I will do a washing method round up so I can remember what to do!


Thursday, 26 August 2010

Techniques- hand carding

After trying out combing as a method of fibre prep I moved on to having a go with my hand carders. I followed the instructions for hand carding in The Whole Craft of Spinning by Carol Kroll, a skinny but very useful book.
s
First I pulled locks out of the washed mass of fluffiness and placed them on the left hand carder.
s
s
The right hand carder is then brushed over the left with the paddles held in opposite directions. I can't show pictures of this in action as I need two hands for the carders and a third for the camera, one day I might recruit some help to take pictures as I go.
s
s
The fibre is moved from the left carder to the right and recarded, this is repeated until all the fibre is nicely combed out across the surface of the hand carders with all the tangles removed.
s
s
I wanted the fibres lined up in a parallel fashion, worsted style (I am a bit sketchy on the woollen/worsted thing, the problems of being largely self taught, but I wanted an approximation of the roving you buy). To achieve this the combed fibre was lifted off each carder, giving a sheet of parallel fibres.
s
s
The sheet of fibres was rolled from side to side to give a fat sausage of fibre (turned through 90 degrees for this photo).
s
s
Just to see if it would work I lightly drafted the fibre sausage to give a longer roving style sausage for spinning,
s
s
The hand carding was definitely a lot faster than combing, although still quite a slow process (compared to waving a credit card at the internet). The finished product was also not quite and neat as the combed fibre, more short fibres has passed through making a few little lumps that needed pulling out. Possibly easier to spin from though.
s
There was quite a lot of waste fibre once the locks had been pulled out, shorter bits and tangled fluff, I could possibly have carded this too, but it would only be worth it on a really special fleece. The waste level was comparable to combing as a preparation method.
s
And just because they are called hand carders they are not for combing hands with. They are surprisingly sharp!
s


Thursday, 19 August 2010

Techniques- The scrap down

This is not really a technique, more of a personal mini crusade to free the neglected mini balls of yarn that lurk abandoned in the corners of stash boxes all over the World.
s
I finished a project at the start of the week (more on that tomorrow), and was left with a familiar sight to all knitters- a walnut sized ball of yarn, maybe 10g at the most. Usually I would pack it neatly back in plastic and tuck it into my stash tub. To be ignored for the rest of ever.
s
As I am making an effort to cut down on my stash I decided that mini balls are not allowed back into the box, projects must be found!
s
A quick search on Ravelry showed loads of patterns, from my little leftover ball I made these three:
s
s
The top is a 5 stitch band of seed stitch, a button hole at one end and a button at the other and tada! A bracelet.
The middle is a three strand cable bracelet, pattern here.
The bottom is a beer/coffee cozy bracelet- you wear it as a cuff and can wrap at around a hot coffee/cold beer to keep your hand comfy while you drink, then back on the wrist. Pattern here.
s
s
They are a great way to use up pretty yarns, and to show off favourite buttons (I particularly like wooden ones, and these were a bargain). I wouldn't usually have all three on at once though.
s
s
Other small projects I have found include headbands. hairbands, a huge range of bracelets, bangles and wristbands, more cup cozies and flowers to use for decoration.
s
As well as using up those yarn nuggets, and thus freeing up stash space they are quick to make. And having a stock of them makes for great emergency presents/forward planning. Although to be honest I like these three so much I am keeping them, in fact I may like them more than the main project!


Thursday, 12 August 2010

Techniques- Fibre combing

This is not really a how to, more of a what I did next. The fibre I washed last week was nice and dry by the weekend, I decided that the washing had not been too much of a fail after all and to get on with making the fleecy pile into something I could spin with. The first technique on my list was combing.
s
Since I am skint I found these in the local pound shop- £1 each. They are reasonably strong as well.
s
s
I did try a comb/carder like thingy combo, but it was not overly successful (pictures may follow at some point). So the rest was done with just the two sided dog comb.
s
First a lock was pulled off the fleecy mass
s
s
Then combed, towards the tip first, then towards the cut end (the butt? giggles immaturely). The more tangly ones I used the wider teeth first then turned the comb over and gave it a go with the finer side.
s
s
Mmmmm, fluffy
s
s
Mmmmmm, lots of fluffiness
s
s
The locks came up beautifully fluffy, there was quite a bit of rubbishy stuff, mostly shorter hairs and the like that got binned.
s
The main downside to combing it lock by lock is that it takes ages, I haven't weighed the box of fluff yet, but there will not be a lot in there. Next week I will be giving hand carders a go.


Thursday, 5 August 2010

Mousey pattern

s
I posted this mousey as a FO a while back, and someone asked for the pattern. It is based on the one from the catwarming set by Michelle Ameron in the stitch and bitch book, but I altered it to work in the round and reduced sewing together of pieces.
s
What you need:
Yarn
Stuffing
Embroidery thread
Needles for working in the round, I used dpns but it should be workable for other methods.
s
I have not given a yarn type, needle size or gauge as this pattern is ideal for using up scraps and the needle required is whatever gives anice firm fabric that the stuffing does not poke through (I used DK yarn and 3mm needles).
I opted for acrylic yarn and polyester toy stuffing rather than using wool and wool scraps, this has two advantages- it can be thrown in the wash and I did not want the cat to get a taste for wool!
ss
There are two options for the ears, either make them seperately first or leave a REALLY (really really) long tail when you cast on to make them from, this allows the whole toy to be made from one length of yarn so there are no sewn on bits to fall off.
s
Ears (make 2):
CO8 sts
Work 4 rows stst
k2tog across row
Cut yarn and thread through sts and tie, leave tail for sewing on.

Body:
CO 3sts (remember to leave a long tail if you are doing the ears that way)
Working as for I-cord k one rnd
Use a new needle to kf&b of first st, repeat for each st. You should now have 6sts spread across 3 needles.
rnd 3 and all odd rnds k all sts
rnd 4: Kf&b twice, k2 kf&b twice
rnd 6: k2, (kf&b, k1) 4 times
rnd 8: (k2, kf&b) twice, k2, (kf&b, k2) twice
rnd 10: (k3, kf&b) twice, k2, (kf&b, k3) twice
rnd 12: (k4, kf&b) twice, k2, (kf&b, k4) twice
Continue increases as above until mouse is desired size
s
k all sts for approx 2.5cm/1 inch.
Add ears in desired position, either:
Firmly sew on pre made ears- weave the yarn tail down the edge of the ear and use to sew onto body.
or
Thread cast on tail into a tapestry needle, bring needle in through nose and up in ear position. Bring yarn over a spare needle and back into work. Repeat to make 8 loops over the needle along the line of the ear. Bring the yarn back out and work the sts as for the ear above.
When you have finished the first ear weave the tail back down the edge of the ear, into the body and repeat process for the second ear. Tie the end off firmly inside the body.
s
Use the embrodiery thread to add nose and eye details if desired.
s
Continue knitting body as before until it is your desired length.
s
Stuff the mouse quite firmly then close the body as follows:

rnd 1: (k2, k2tog) repeat around round
rnd 2: k all sts
rnd 3: (k1, k2tog) repeat around round
rnd 4: k all sts
rnd 5: (k2tog) repeat round round
s
Depending on the size of the mouse as determined by the increases made additional decrease rounds may be required, repeat rnd 5 until 3 or 4 sts remain.
s
Work remaining sts as I-cord to create the tail. When tail is desired length cast off and sew in ends.
s
Give to cat as bribery to stay away from your stash.


Thursday, 29 July 2010

Techniques- 2 at a time on dpns

No photo tutorial from me this week I'm afraid due to a busy week of work. Wanted to save/share the link to two socks (or anything round) at a time on dpns in knitty ages ago.
Found that through a link on a Rav forum, have been wanting to try it out for ages but did not know how, so now I just need to get some yarn! (and an 8 day week).

Friday, 23 July 2010

Techniques- Making a yarn weight guide

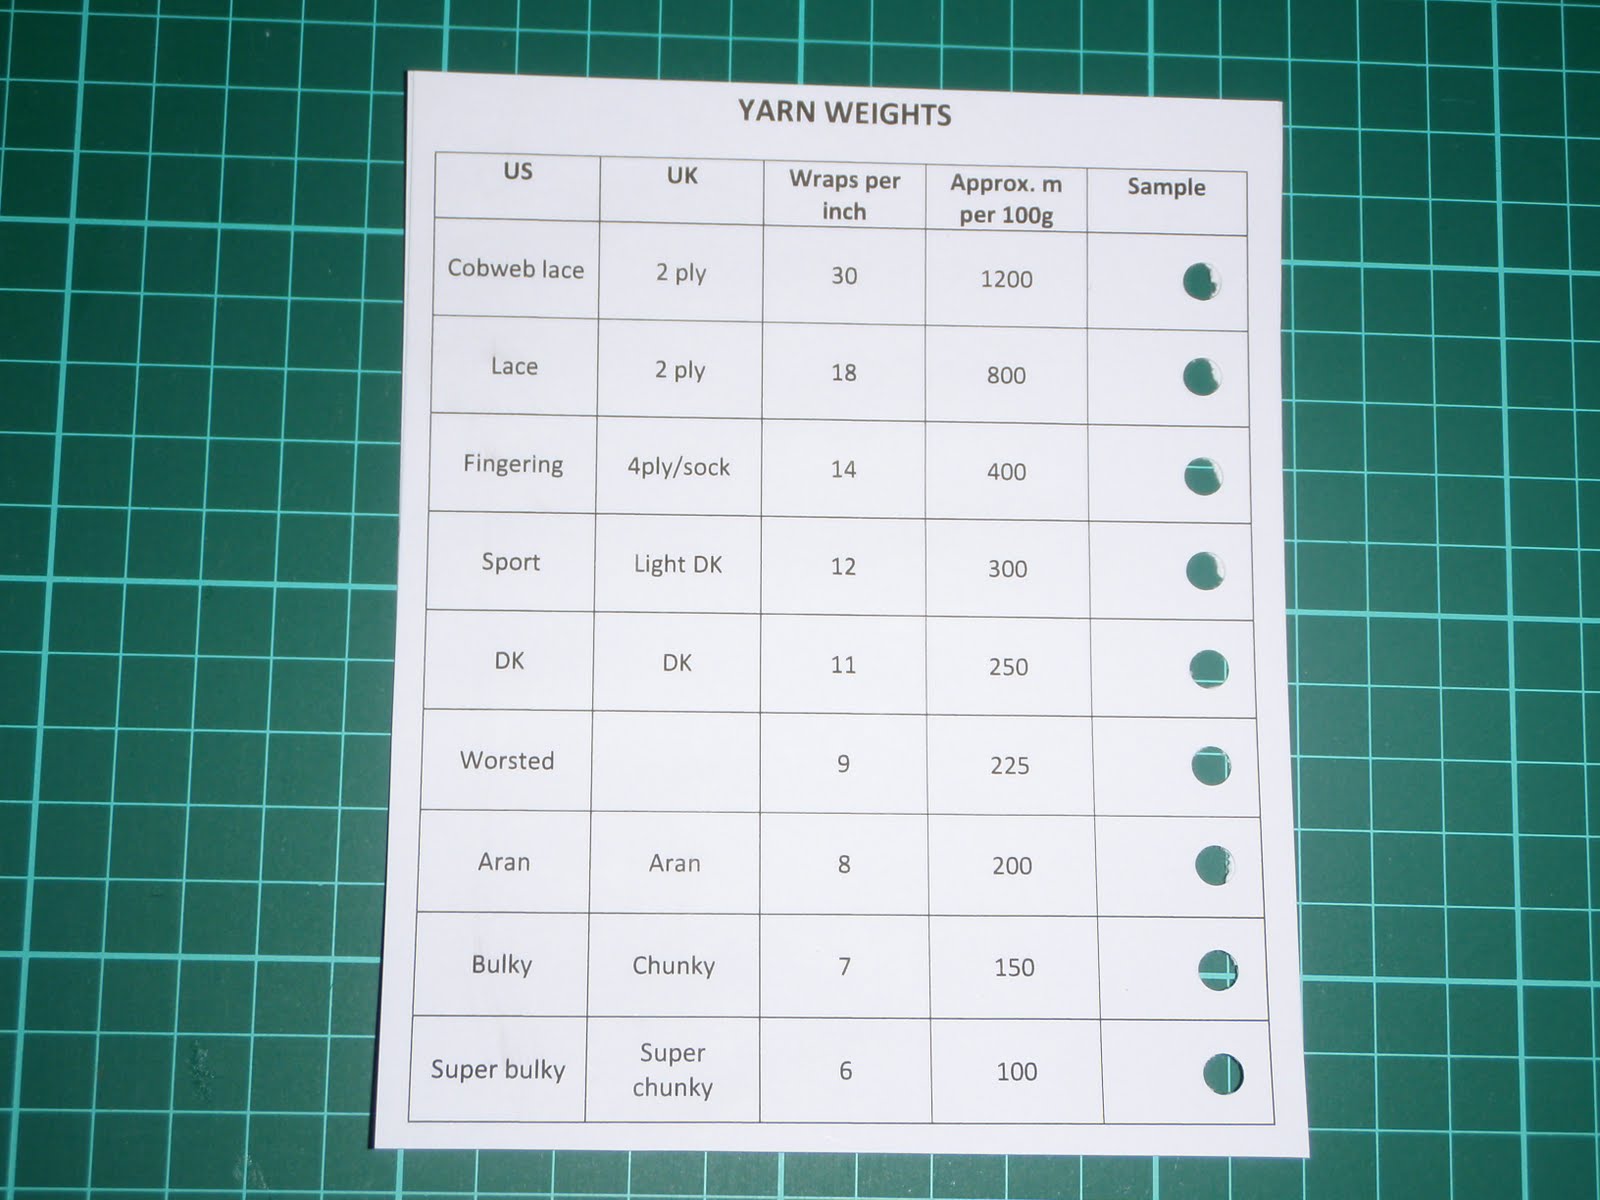
It can be easier to decide what weight a yarn is by comparing it to others of known weight. This is especially true if you get some unlabelled stuff from a charity shop or by unravelling a knitted garment to reuse the yarn.
s
To make this easier I have made up a card with samples of each.
s
First up print a copy of the Yarn weights and needle sizes sheet from the sidebar. Cut it in half and stick one half to either side of a piece of card. When you are sticking make sure there is no text on the back of the sample box as it is going to have holes in.
s
Punch holes in each of the boxes, I found a standard hole punch could reach them all if you work from either side.
s
You can laminate the card if you want to, makes it a bit more robust but not a requirement.
s
s
If you have laminated re punch the holes, the hole punch may not reach with the extra depth of plastic round the edges so you may need to poke them through with a needle.
s
Cut lengths of yarn in each of the weights. For the thinner ones I did about a metre, folded in half twice, poked it through the correct hole to fold it again then tied an over hand knot in the whole bunch of strands.
s
Repeat for all the weights, you will have to use less yarn for the thicker ones.
s
Trim the ends to the same lengths
s
s
This one is missing the chunky as I don't have any, but I'm sure some will pass through my stash at some point.

Thursday, 15 July 2010

Techniques- Dip dyeing, single colour, multiple shades

I recently discovered the fun that is dip dyeing, and having tried to describe the process in words to someone I thought I would share photos of the process with you this week.
s
First up prepare your yarn- tie the skein in several places then soak it. It needs to be good and soggy to avoid white patches so be generous with the time you soak it for. Give it an hour or so, it can usually even be left over night- some fibres, like silk, need a lot of soaking.
s
s
Once it is well soaked, lift it carefully out of the water and squeeze it gently to let some of the excess water out.
s
s
Prepare your dye bath with enough water for the yarn to swim around and whichever dye you want to use according to the instructions, as these vary I will not go in to them here. If required by your dye add vinegar to the pot.
s
s
Bring the dye bath to a simmer.
Wrap your soggy yarn around a stick that is longer than the top of your dye bath is wide (or a wooden spoon/fork is good as the flat surface of the spoon stops the stick rolling).
(The cider in the photo is not for drinking while dyeing, it just happened to be in the kitchen when I took the photo).
s
s
Sit the stick across the top of the dye bath and unravel the first section of yarn into the dye. This will be the darkest section, how much you want to unravel is entirely up to you.
s
s
At intervals unwind a little more yarn into the pot. Each section should come out lighter than the previous one. This one was done in four intervals, each two minutes apart, but again that is up to you depending how you want the yarn to look.
s
s
Unless you want a white section to the end of the yarn drop the final length of yarn into the pot and give it a gentle swirl with the stick to get it under the surface. If you leave the last stage too long there will not be much dye left in the pot and it will come out very pale. That might be what you want, but if not don't leave it too long.
s
s
Leave the pot to simmer to set the dye. This should be about fifteen minutes but may depend on the make of dye.
s
s
Take the pot off the heat and allow to cool to room temperature.
Rinse the yarn then squeeze out the excess water and allow to dry (as for handpainting).
Twist into a pretty skein and take artistic photos on the lawn (this stage is optional :D).
Plan what to knit/gift/sell skein.
s
s
Next dyeing adventure should be dipping for multiple colours so watch out for that one.
s
I would love to see what you make if you follow this tutorial, please leave a link in the comments to pictures so I can see (why yes, I am nosy! :D).


Thursday, 8 July 2010

Techniques- Let's talk about socks baby

I wanted to make that the title as it causes a little imature giggle from me, which is always fun.
s
As everyone knows I like socks about as much as Badger loves mashed potatoes (which is a lot, sorry obscure 90s UK TV reference to Bodger and Badger, if you know what I am talking about you will be singing the song). So I thought I would make the socky wisdom I have collected so far into today's post.
  • For top down cast on loosely, a single cast on is good (needle in the right hand, make loops with the left) as it makes loops rather than actual stitches.
  • For bottom up cast off REALLY loosely, like comedy loose- go up several needle sizes or make loops with the needles you were using. Finding you have cast off too tightly and can't get the sock on is frustrating (go on, ask me how I know).
  • Try top down and toe up, you will probably like one better than the other but at least you will know.
  • Do a decent length of ribbing at the top if you want it to stay put, 15 rounds is good for me but it depends on your gauge etc.
  • If you do a pair of plain socks you can use it as the basis for your gauge next time you use that yarn/needles as the gauge is often given for stocking stitch in the round even on fancy patterns.
  • Using a chunky yarn and simple pattern to make boot socks is a good place to start (one like the super simple knitwit sock pattern is good).
  • Mini socks are also a good way to start if you are ok with slightly fiddly, all the steps of a big sock are in there without the commitment of lots of stitches.
  • For a more complicated pattern the 9 to 5 sock is great and no worries about getting the fit around the foot as it is super stretchy.
  • A bit of negative ease around the foot is good (smaller width of knitting than actual distance around foot), keeps it snug. Ribbing can help here.
  • Make the foot the actual length of your foot, if it is too short it will either pull the heel under when wearing, which is not comfy or the toe will rub through faster.
  • There are lots of ways to make the elements of socks, try different ones to see which works best for you.
  • Use a yarn that will not wear through too quickly, dying from lots of wear is fine, dying after three wears is disappointing.
  • Holes can be fixed by darning, reknitting sections or making the wearer a new pair.
  • Handknit socks are for wearing, not for looking at!

I in no way think I have collected all the sock based wisdom there is so at some point there will be another part to this.

Saturday, 3 July 2010

Techniques- Spinning wheel selection

I have been pondering on getting a spinning wheel (ok, obsessing over it). Leaning towards one that folds as there is not a lot of crafting space to spare around here, found this website to be fantastic for comparing the readily available folding wheels. It is US based but still great.

Thursday, 1 July 2010

Techniques- Plaiting roving

I wondered how to plait roving, it looks so nice on the webpages I wanted to make mine look the same. Managed to find a tutorial here, it is nice and striaghtforward, but I thought the page was worth saving and sharing.

Techniques- Oven dyeing fibre

Have been wanting a way to cut down on my clingfilm use, increase the amount of fibre and I can dye and limit felting problems. This oven dyeing tutorial has definite possibilities so am saving the page. When I have given it a go I might do my own set of photos if it all works out.

Wednesday, 30 June 2010

Greenhouse dyeing

At knit group a while back we were talking about how some people dye yarn in their car on hot days and every time I have got in the car for the last two or three weeks I have thought about it, but not got round to organising some.
s
On Monday I had a bit of a dyeing session (photos to come on FO Friday), as I was handpainting roving I thought I would try a small sample. The car was at work with my OH so I decided to use my mini greenhouse instead. I have tried it for rising bread dough in the past, which worked well so I thought it had potential.
s
The handpainting and wrapping clingfilm was done in the usual way, then I sat it on a roof tile that was hanging around the garden and put it in to cook.
s
To show you it really is a greenhouse (the dye parcel is the slightly sad looking bundle top left):
s
s
Dye parcel in close up, I closed the door and left it for about 24 hours, with just occasional prodings and temperature checks.
s
s
Since it did not puff up in the way of a stove top steamed parcel I put a thermometer in with it to have an idea of how hot it got. Not that I know how hot it needed to be.
s
s
The moment of truth was the next morning when I unwrapped it. To be honest I was expecting a lot of mess with dye running everywhere but was pleasantly suprised to find very little residual dye, a little more than a typical steamed parcel, but still not much and the colours stayed nice and strong.
Even when I gave it a wool wash soak only a little extra came out:
s
s
The weather was good yesterday, so I dried it outside without any trouble.
s
s
There's about 10g there, not sure what it will be, but that is for another day. I am keen to get spinning it but am trying to resist as I already have a spinning project on the go.
s
I will definitely be giving greenhouse dyeing another go, it seems to work and after all its free heat, better for the environment and gives something to talk about.