For this week's technique post I thought I would try my hand at writing one myself. As promised yesterday there are a lot of photos. The method I use comes from a combination of The Twisted Sister's Sock Workbook by Lynne Vogel and The yarn lover's guide to hand dyeing by Linda La Belle.
s
s
The example here was the merino and silk laceweight yarn, dyed with Jacquard acid dyes.
s
First you need some yarn to dye, it can be undyed as here, or you can overdye a paler colour with darker ones.
s

s
Untwist the skein and check the number of ties, you need at least four, more is better as it reduces tangling during the dyeing. If there are only a few add some more by looping undyed yarn in a figure of eight pattern across the width of the skein (avoid dyed yarn as some colour may transfer, I used blue ties in this example as I was dyeing the yarn blue anyway).
Put the yarn to soak in a large bowl of water, it will need to be fully saturated before you start dyeing so will need at least an hour, longer for silk.
s

s
Mix up your dyes according to the instructions, these vary by dye type so will not cover them here. The acid dyes need to stand for an hour after mixing which corresponds nicely with the soaking yarn.
s  s
s
Lay out a sheet of clingfilm on your work surface. Lift the yarn from the bowl of water and allow the excess to run away. Spread the wet yarn out on the clingfilm. Spread the yarn out as much as possible to make the dyeing easier.
s
 s
s
Start applying the dye to the yarn, I used sponges as you can see in the picture. How much you apply, colours, how you apply it etc all depend on the effect you want, experimenting is the best way to find out (although remember you can only overdye with a darker colour).
s
 s
s
When you are happy with the top you need to carefully turn the yarn over and apply more dye to the back as there will be patches that have not soaked through (unless that is the effect you are after).
s
 s
s
Once you are happy with the dye use a spray bottle to lightly spray vinegar (or other fixing acid) over the top surface of the yarn. There is no need to spray both sides. (I have forgotten this step a few times, and although fixable it tend to get very messy!).
sLay out a sheet of clingfilm on your work surface. Lift the yarn from the bowl of water and allow the excess to run away. Spread the wet yarn out on the clingfilm. Spread the yarn out as much as possible to make the dyeing easier.
s
 s
sStart applying the dye to the yarn, I used sponges as you can see in the picture. How much you apply, colours, how you apply it etc all depend on the effect you want, experimenting is the best way to find out (although remember you can only overdye with a darker colour).
s
 s
sWhen you are happy with the top you need to carefully turn the yarn over and apply more dye to the back as there will be patches that have not soaked through (unless that is the effect you are after).
s
 s
sOnce you are happy with the dye use a spray bottle to lightly spray vinegar (or other fixing acid) over the top surface of the yarn. There is no need to spray both sides. (I have forgotten this step a few times, and although fixable it tend to get very messy!).
s
Place a second sheet of clingfilm over the top of the yarn and press together with the sheet below. Wrap the parcel with clingfilm a few times, I tend to do three wraps to minimise risk of leakage, do not make this too tight or the parcels will pop when steamed.
s
 s
s
For easier movement the yarn parcel can be folded into a small stack.
s
 s
s
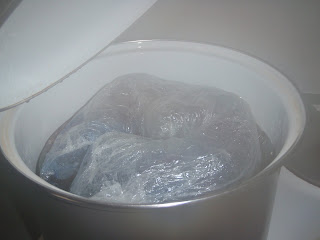
Prepare your steamer. If you are not using food dyes this should be kept separate from food pans. The steamer needs to be lifted a few inches above the water level. I put about two inches of water in the base of the pan shown, stack up two glass ramekins (free ones from Gu souffles in the reduced section of the supermarket, nomnomnom) in the middle of the pan and balance the steamer on top of that.
s
 s
s
Arrange the yarn parcel on top of the steamer, try to avoid having parts sitting on top of other bits, a coil or an S shape work well.
s
 s
s
s
 s
sFor easier movement the yarn parcel can be folded into a small stack.
s
 s
sPrepare your steamer. If you are not using food dyes this should be kept separate from food pans. The steamer needs to be lifted a few inches above the water level. I put about two inches of water in the base of the pan shown, stack up two glass ramekins (free ones from Gu souffles in the reduced section of the supermarket, nomnomnom) in the middle of the pan and balance the steamer on top of that.
s
 s
sArrange the yarn parcel on top of the steamer, try to avoid having parts sitting on top of other bits, a coil or an S shape work well.
s
 s
sSet the heat going and steam for 20-30 minutes. The clingfilm will puff up, showing the yarn has got hot enough (if the clingfilm was not completely sealed this may not happen).
s
 s
s
Turn the heat off and leave to cool. This take a long time and is best done overnight. Letting it cool completely gives better colour and much less residual dye to wash out. It is difficult though as the parcels are so tempting but it is definitely worth it. s
s
After soaking squeeze the excess water out by wrapping the yarn in a towel and squeezing it well. Hang the yarn up to dry. A little dye might still drip out so I usually put an old newspaper underneath if it is hanging over anything important like the bathtub. Once it is dry it is ready to use.
s

s
 s
sTurn the heat off and leave to cool. This take a long time and is best done overnight. Letting it cool completely gives better colour and much less residual dye to wash out. It is difficult though as the parcels are so tempting but it is definitely worth it.
Once the parcel is cold unwrap it in the sick, bin the clingfilm and let running water flow gently through the yarn to wash away residual dye. This needs to be done very gently to avoid felting,-don't let the tap run straight on to the yarn, direct the flow down the side of the sink.
Once the water is running clear the yarn can be washed in a basin of water with a little wool wash (optional, a tiny bit of fairy liquid or shampoo can also be used).
s
s
 s
sAfter soaking squeeze the excess water out by wrapping the yarn in a towel and squeezing it well. Hang the yarn up to dry. A little dye might still drip out so I usually put an old newspaper underneath if it is hanging over anything important like the bathtub. Once it is dry it is ready to use.
s

My post this week was on dyeing as well, although not nearly so professional! Pretty blue.
ReplyDeleteI am going to start dyeing this summer...very good tutorial. You've inspired me to start sooner than later. Thanks for sharing.
ReplyDelete